Foundation Footing Pouring and Stone Slinging

Just a couple pictures of them pouring the concrete into the foundation footings.

After the pour the footing, the install the sump pit and connect it to the “Big O” drainage tile around the exterior perimeter of the footing:

Finally, the “stone slinger” shows up and shoots about 20 tonne of stone into the interior of the footing to fill in the area, and around the outside of the footing to cover the drainage pipe:

Drilling for Water!

After the foundation footings crew came in, the well driller showed up promptly the next day (Tuesday June 10th) to start drilling our well – unlike city folk we have no municipal water or sewer services so we’ve got to drill a well for our water, and have to have a septic system installed to take care of…well, you know  🙂

To select a spot to drill the well, we first started by selecting a location which was the prescribed distance from our septic system location (50′ minimum), and also where would be a good location for the water lines to enter the foundation.  From there, the well driller used his “dowsing rods” to check if there is any water below ground, in or around the area.  In our case the rods indicated water at a spot close to where we selected so we decided we would have a shot there.

Anyone who knows me, knows that I am not one to generally buy into such things like dowsing, but really it didn’t make any difference to me how the well driller picked the spot – I was going to just trust his judgment regardless of how he made his determination.

They started drilling at maybe 9am and had hit water at 140′ by around 11am.  They “shocked” the well (basically the dump in a bunch of chlorine) and capped it off, and were set to return later for a yield test.  That day was today, and as it turns out, our well is artesian, which means we hit a good vein of water under positive pressure, that will just flow naturally to the surface through our well – if we ever have a power outage situation, we’ll still be able to get water from our well – great news for a well!  We had heard there was good water in this area and this experience seems to have borne that out.  Also, perhaps some anecdotal evidence for dowsing rods?

Foundation Footing Forming & Radon piping

This week has been a busy one – first off we had the foundation crew in to set up the forms for the foundation footings, after they were done I installed the “radon ventilation piping” as recommended in the latest Ontario Building Code.  Basically this is just 4″ PVC pipe that has holes drilled along one side (typically used in septic system weeping beds) and runs around the interior perimeter of the foundation footings, and then come up through the basement slab, where it is for now just capped off – but at a later date could be vented outside.

I guess right now the townships around these parts of eastern Ontario just don’t know if radon gas will ever become an issue, but it was only a few hundred bucks and a couple hours of time to lay the pipe in place, and why not do that now before pouring our basement slab floor – a lot easier to do it now than to add it later if radon ever does become a problem, I figure.

Foam-tastic!

We ordered and took delivery of 140 sheets of 2″ x 2’x8′ XPS foam and 150′ of weeping tile drain (for radon protection).  We also got a 20’x100′ roll of 6mil poly to use as a vapour barrier under the XPS.

XPS Foam & Weeping Tile Drain

The XPS foam we will double up to give a total of 4″ of foam, or R-20 insulation under our slab.  From there we will staple down our 1/2″ hePEX tubing to provide the radiant heat in the basement slab.


Excavation!

In the old days, we would have been out there with shovels and pickaxes, busting our asses digging through that rocky, rocky soil.  Thankfully, we were able to leverage some modern technology to assist us with the excavation.  All told the job was done in about two hours!

Because there is bedrock about 2′ down across our site, we couldn’t go very deep, but, we may be able to arrange a walk-out basement with this setup!

Staking out the Site for Excavation

Today, Heather and I spent the afternoon staking out the site for the excavator who is arriving early this coming week.

This was a really good opportunity for a time-lapse video, but unfortunately we don’t yet have a good DSLR camera, so did not get the opportunity to set it up – we *are* looking for recommendations for a decent DSLR!  Right now the current contender is the Canon EOS Rebel T3i but if anyone else has other suggestions we’d be happy to hear them!

Building Permit Update

After meeting with the building inspector on May 2nd and applying for our permit, we finally heard back from the inspector on May 21st, when he sent the following response:

Please be advised that a construction permit for the new dwelling at the subject address cannot be issued at this time until the following items have been completed;
1. Provide a revised value of construction.
2. Remit all fees to be determined on the above
3. Provide specifications on heating and HVAC design from mechanical installer.
4. The plans shall indicate a 120VAC smoke alarm installed with battery back up power to bedroom, 120VAC smoke alarm to basement and ground floor levels, a 120VAC carbon monoxide detector to ground floor level, an exhaust fan to exterior from bathroom and kitchen (or HRV exhaust inlets), sealed sump pump and floor drain to basement level. These Changes may be initialed on the plans.

Points #1 & #2, easy enough – we’d discussed with him previously about getting him revised budget numbers so no surprises there.

Point #4, not a big deal – basically he takes a copy of our plans, writes in his expected changes, gives me a copy, then verifies that I’ve done such when we actually build.

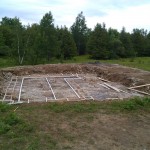
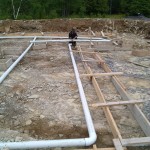
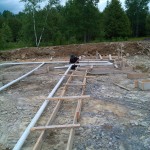
However, point #3 was a bit of a concern – we had been under the impression that because we were planning to use  a wood stove that this would not be an issue.  After reading the above, and giving wood heating further consideration, I decided to learn how to do our own heat loss calculations and figure out how to install in-floor radiant heating using a hydronic (water) based system.  I ordered a copy of Modern Hydronic Heating from Amazon.com on May 22nd, received it first thing on May 24th, and read the majority of it on May 24th and May 25th.  After gripping a grip on the basics I downloaded some software called LoopCAD which has a 30 day free trial and got to work planning out the PEX tubing layout, in the basement concrete slab, and under the floor, between the floor joists, for the main floor.  All this in a bid to get a “heating plan” together for the inspector for a follow-up meeting we set up for May 26th @ 5:30pm.

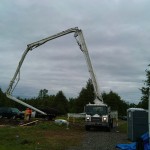
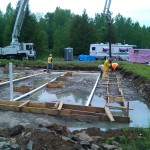
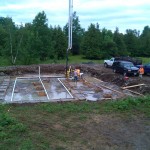
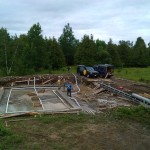
When I presented our designed plan to the inspector he was clearly impressed by the work I had done and issued the building permit!  So we are good to go, full steam ahead with the build!

First Mail!

This post is a little late but better now than never – the following pictures are from the day after we set up the mailbox!

Felt pretty cool seeing the flag up for the first time.

Mailbox Update: Completed and Installed

Today was a cracker of a day, even though the mosquitoes are out in full force, it seemed an opportune time to get out and finish off the mailbox.  This involved stenciling/painting on our civic number, cutting a piece of 3/4″ plywood to mount the mailbox to, and cutting a 4×4″ western red cedar post to length (targeting bottom of mailbox @ 42″ high).  The plywood was then fastened to the 4×4″ post using four #8 x 1 1/2″ screws, and mounting the mailbox to the plywood using four 1/4″ x 1 1/4″ bolts.  I used locknuts to hold the mailbox to the plywood – not sure if it was necessary but it surely can’t hurt!

Here’s a small gallery of the bits and pieces throughout the process:

Some Spring Gardening

Over the past week we have been darting out in between the rain showers to get our garden started.  This included bolstering our berry patch with a new blueberry plant, and 25 everbearing strawberry roots – this added to our already healthy blueberry and two raspberry bushes.

We also chose a couple of high-bush cranberries to plant nearer to entrance to our property for a bit more interest when you first come in.

Garden Started
Our newly planted herb / lettuce and ornamental plant garden. Not much to see, yet!

On top of that we also started the herb and lettuce patch, by planting eight heads of red-leaf lettuce, 16 regular / curly parsley plants, another 6 italian parsley, and I think around 8 kale plants – god willing we will be self-reliant in terms of producing fresh greens for bunny’s daily needs in the near future.

A friend of ours had, a few years back now, given us a Cornos Alternifolia which we had planted in Toronto, but liked it so much we dug it up and brought it here with us.  We got that in the ground with a good bed of compost to settle it in, and hopefully it will thrive here.

Heather also ordered a selection of flowers and deer resistant plants which we planted appropriately around the garden bed – we’ll try and get some picture of them when they poke their way up and start making a show of it!

I was absolutely savaged mercilessly by mosquitoes during all the planting and am now covered in welts from all the bites.  Down with mosquito kind!