Just a quick update – we called in to the Health Unit’s automated water testing line and found out that our water sample passed! Zero coliforms and zero fecal bacteria found, so that is another item off the list in our journey to our certificate of occupancy – officially potable water!
Another small victory in a seemingly endless struggle!
We are slowly but steadily working our way to our certificate of occupancy. The building inspector provided us a helpful list of things that have to get done, before we can get it, which consists of:
water potability certificate from the Health Unit: the contractor who drilled our well is coming by today to chlorinate the well and then we can get the water test done.
ESA certificate: We have almost completed everything necessary to get our final electrical inspection done, then we can check this item off the list.
HVAC and plumbing completion: Plumbing has been completed, but we still have to connect our radiant heating system, the fireplaces, and the HRV.
coverage of combustible insulation: we have not started this yet but hopefully can wrap it up in not too long.
drywall installed but not necessarily taped: complete!
guard and handrails installed (temporary rails are OK): complete!
So things are moving along reasonably well. As mentioned in the last post regarding the hardwood flooring, to change the direction in the bedroom, we had to use a “spline”. Basically I cut a strip of 1/4″ plywood, about 7/16ths of an inch wide, and glue it into the groove of a few pieces of the flooring:
Gluing in a spline
After about 30 minutes when the glue sets up you can change the direction you are laying down the hardwood floor by putting that spline into the groove of a flooring board:
Changing directions in hardwood floor
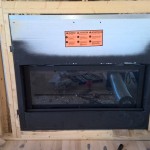
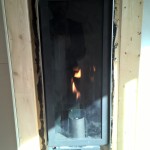
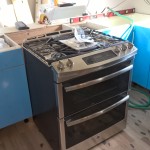
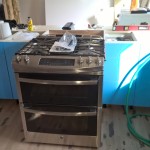
I am trying to stay focused only on the work that needs to be done in order to get our certificate of occupancy, so I figured I should connect the gas range and fireplaces and get them squared away, so that if there is any inspection required for them, we can get that done before drywalling them in.
Living room fireplace 1/2
Living room fireplace 2/2
Bedroom fireplace
Gas range 1/2
Gas range 2/2
The living room fireplace and the gas range both required that I convert them to run on propane (instead of natural gas as shipped from the factory). I diligently carried out the conversions, taking care to follow all instructions provided and then tested all connections with soapy water to ensure no gas leaks.
In the interest of wrapping up our electrical, now that the weather is nice I finally got outside and properly buried our electrical ground wires, and also closed in the 30Amp generator inlet port we’ve been using to charge the battery bank.
30amp generator inlet
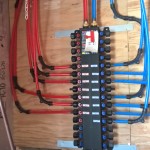
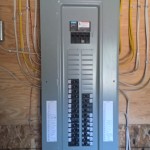
Here’s a couple pictures of the completed electrical service panel and also our plumbing manifold, with everything connected except for the two remaining lines for the bathtub in the master bathroom.
Plumbing connections completed
Service Panel closed and labeled
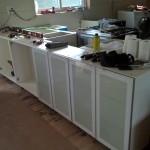
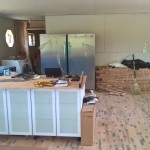
I also did a little more work on the kitchen cabinets to get a temporary working area going so that we could free up some space to work in the main bath/laundry room. Because we running the cabinets out as a peninsula type affair, I added some wood supports to that I’d have a way to securely fasten the cabinets back-to-back:
Adding supports to cabinets
Once that was done I could get the cabinets installed on the back side of that and get them all leveled and set up with a piece of 3/4″ plywood for a temporary working surface.
Kitchen 1/3
Kitchen 2/3
Kitchen 3/3
In the second picture above you can see that we still have a few more sheets of drywall, those are to finish out the main bath/laundry room and around the fireplaces.
We unfortunately still have random problems with our internet so that’s why this post was a bit late, but there isn’t much we can do about it until after we get our siding on – once that is in place we can get the tower installed to get real internet 🙂