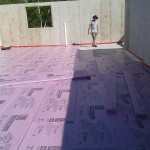
Oh boy, here is where things start to get fun! Today saw the start of the real work laying our under slab rigid insulation. I only got one layer of it down, but did a pretty darn good job of it if I do say so myself.
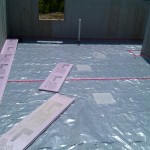


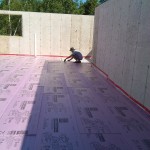

What we are doing here is putting down two layers, of 2″ thick rigid extruded polystyrene insulation – this stuff is actually made just up in Valleyfield, QC, which is just around the corner from our summer cottage, so it’s good to know our money is staying in Canada. It also has a nice “shiplap” edge so you can easily mate each successive piece to the previous. Each layer of the 2″ insulation has an R-value of 10, so in total we will have R-20 under our slab – double what the Ontario Building Code requires.
Installing this stuff is super easy, if a bit time-consuming. You basically start in one corner and start laying out pieces until you get to the end, cutting the end piece to size. You start the next row with the leftover bit from the end of the previous row, to give a bit of offset in the seams, and eventually the whole area is covered edge to edge. It only really gets a bit tricky making the cut-outs for the sump-pump pit and radon ventilation pipe, and when you have to cut odd shaped pieces to fit in at the ends (or around corners), but my table saw makes short work of it!
By the end of day 1 I was able to get the complete first layer of insulation installed, and started taping all the seams with ‘tuck tape’. Tomorrow I’ll finish that taping and then lay down the second layer of insulation (weather permitting!)