Monthly Archives: June 2014

Radiant Heating Manifold Connected and Pressurized

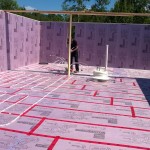
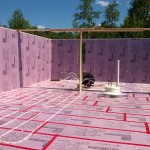
You might think that connecting the manifold and pressure testing it would be a straightforward affair – and it does most certainly appear so at first glance.  Connecting the supply / return loops to the manifold is actually not so bad, you just cut the tube to length, drop a 1/2″ ProPEX ring with Stop onto the end of the tubing, and then expand the tubing using your tool of choice (I’m using a cordless Milkwaulkee ProPEX Expander Tool which is pretty slick!) – once expanded you drop in your fitting and let the tubing shrink back around it (which takes only a minute or so).  From there you connect that fitting to the manifold – again, about as straightforward as it gets.

Connected and Pressurized Manifold

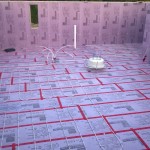
Where it gets tricky, is pressurizing the system.  I ordered and received a “Pressure Test Kit” which you can see attached to the left side of the manifold in the above picture.  The problem was, that this kit came as unassembled pieces, and after assembling them, it would not hold pressure.  After dis-assembling, and re-assembling the kit several times, each time using progressively more aggressive pipe sealing measures, I finally got all the leaks sorted and the system seems to hold 80psi of air well for several hours.

You can also see that I re-mounted the manifold to be level before I connected all the tubing!

Radiant (Hydronic) Heating Installation – Basement Slab

Yesterday and today we spent our time furiously installing the Uponor 1/2″ hePex Plus tubing for the radiant in-floor heating in the basement.  When the concrete floor is poured the tubing will be completely encased and ready to heat the floor.  In the last few pictures you can see that I “scabbed” together a beam to suspend our distribution manifold from (an Uponor 5-loop engineered plastic manifold):

Next step is to use our compressor and get the system up to 80psi, and make sure it’s holding air and leak-free!

Basement (Interior) Insulation Complete!

Well the last few days have been reasonably eventful.  Continuing on from the work in the previous post, we managed to complete the rest of the basement wall insulation and the interior of the basement insulation is now 100% complete!

In the midst of it all we had some rain so we made some efforts to protect the basement with a tarp (with all that insulation it’s basically like a big water-holding tub) – this did not initially go as planned but in the end we managed to collect most of the rainwater on a tarp and direct it down the sump pump pit to be rid of it.

In that last picture in the above image gallery, I am just doing a test of gluing the exterior insulation to the exterior wall – I usually prop some stuff against each board as I go to make sure they are well secure as the adhesive sets up.  When I checked on it this morning, it appears to be attached well, so that’s a good sign.

Today we will get started laying out the radiant heating 1/2″ PEX tubing (we purchased Uponor 1/2″ hePex Plus, a 1000′ roll), so we will be taking some photos as that progresses and  be sure to share them a little later on!

Note to self: Always secure your garbage in the country – the night before last a coyote got into a bag of garbage I forgot to secure and made quite a mess – also, not the kind of animal you generally want to attract!

Basement Insulation – Day 3

Day 3 of the work progressed much better as I was significantly less sore from the day before.  I got the second layer of insulation completely down and taped about 30% of it.  Heather and I also moved a whole bunch of insulation into the basement so I can more readily fetch it when I’m putting up the walls.

Lastly, I got out the PL Premium (construction adhesive) and glued up a couple sheets on the wall just to see how it would go – hopefully I evened out the wall enough for this to go up quick!

It looks like rain may be on the way in a few days so I shall begin day 4 with a renewed pace in the hopes of getting most of the walls completed today!  Thanks for reading!

Under Slab Insulation – Day 2

I was very sore from all the work on day 1 – so not nearly as much got done on day 2.  I was able to complete taping all the seams on the first layer and started laying the second layer of insulation:

I got maybe 25% of the way done laying the second layer, but got most of the fiddly stuff out of the way like around the sump pump pit and radon ventilation pipe.

After a liberal application of Icy-Hot ™ I feel day 3 will be more productive!

Under Slab Insulation – Day 1

Oh boy, here is where things start to get fun!  Today saw the start of the real work laying our under slab rigid insulation.  I only got one layer of it down, but did a pretty darn good job of it if I do say so myself.

What we are doing here is putting down two layers, of 2″ thick rigid extruded polystyrene insulation – this stuff is actually made just up in Valleyfield, QC, which is just around the corner from our summer cottage, so it’s good to know our money is staying in Canada.  It also has a nice “shiplap” edge so you can easily mate each successive piece to the previous.  Each layer of the 2″ insulation has an R-value of 10, so in total we will have R-20 under our slab – double what the Ontario Building Code requires.

Installing this stuff is super easy, if a bit time-consuming.  You basically start in one corner and start laying out pieces until you get to the end, cutting the end piece to size.  You start the next row with the leftover bit from the end of the previous row, to give a bit of offset in the seams, and eventually the whole area is covered edge to edge.  It only really gets a bit tricky making the cut-outs for the sump-pump pit and radon ventilation pipe, and when you have to cut odd shaped pieces to fit in at the ends (or around corners), but my table saw makes short work of it!

By the end of day 1 I was able to get the complete first layer of insulation installed, and started taping all the seams with ‘tuck tape’.  Tomorrow I’ll finish that taping and then lay down the second layer of insulation (weather permitting!)

Under Slab Vapour Barrier

This is entirely un-exciting, but a simple fact of building a house – under your basement slab the Ontario Building Code requires the installation of a vapour barrier.

Typically, and in our case, this is 6mil plastic sheeting.  It comes in rolls of 20’x100′ and is a bit unwieldy to maneuver, but once cut to size (with a generous overlap for the seams),  it lays down quick:

Basement Wall Cleanup

The first order of business after the foundation guys were done removing the forms for the walls and damp-proofing, was to get in there and clean up the inside of the basement walls so that I can readily attach rigid insulation to it.  If you look at the following picture of the basement walls you can see the concrete “nubbies” I have to remove to make sure the insulation will sit as flush as possible with the wall.

Basement wall detail - note the concrete "nubbies" sticking out here and there
Basement wall detail – note the concrete “nubbies” sticking out here and there

Basically how you remove these, is you just whale on them with a hammer and smash them down flush…only really takes a couple of good whacks to each one, but it’s a bit of a hassle for the higher up ones as I have to move my ladder around to reach them easily.  After that is done, we’ll be laying down the vapour barrier, then the rigid insulation that goes under our basement floor slab.

Basement Walls!

After the foundation footings had been poured, the crew came back to set up the forms for the basement walls, and to have them filled up with concrete.  These crews can get these forms up pretty quickly, they started in the morning about 8am and the walls were poured by the end of the day.  This included them dropping in four 5’x4′ forms to create void spaces in the walls where our windows will go.

Foundation Wall Forms

After they pour the walls, they take the wall forms off and this is what we’re left with:

Wall Forms coming off!

Then finally, after they get all the forms off, they apply the waterproofing tar-like stuff to keep any water from seeping through the walls:

Completed foundation

Things are looking good!

Foundation Footing Pouring and Stone Slinging

Just a couple pictures of them pouring the concrete into the foundation footings.

After the pour the footing, the install the sump pit and connect it to the “Big O” drainage tile around the exterior perimeter of the footing:

Finally, the “stone slinger” shows up and shoots about 20 tonne of stone into the interior of the footing to fill in the area, and around the outside of the footing to cover the drainage pipe: