Monthly Archives: May 2014

Staking out the Site for Excavation

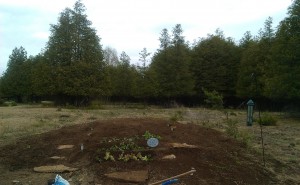
Today, Heather and I spent the afternoon staking out the site for the excavator who is arriving early this coming week.

This was a really good opportunity for a time-lapse video, but unfortunately we don’t yet have a good DSLR camera, so did not get the opportunity to set it up – we *are* looking for recommendations for a decent DSLR!  Right now the current contender is the Canon EOS Rebel T3i but if anyone else has other suggestions we’d be happy to hear them!

Building Permit Update

After meeting with the building inspector on May 2nd and applying for our permit, we finally heard back from the inspector on May 21st, when he sent the following response:

Please be advised that a construction permit for the new dwelling at the subject address cannot be issued at this time until the following items have been completed;
1. Provide a revised value of construction.
2. Remit all fees to be determined on the above
3. Provide specifications on heating and HVAC design from mechanical installer.
4. The plans shall indicate a 120VAC smoke alarm installed with battery back up power to bedroom, 120VAC smoke alarm to basement and ground floor levels, a 120VAC carbon monoxide detector to ground floor level, an exhaust fan to exterior from bathroom and kitchen (or HRV exhaust inlets), sealed sump pump and floor drain to basement level. These Changes may be initialed on the plans.

Points #1 & #2, easy enough – we’d discussed with him previously about getting him revised budget numbers so no surprises there.

Point #4, not a big deal – basically he takes a copy of our plans, writes in his expected changes, gives me a copy, then verifies that I’ve done such when we actually build.

However, point #3 was a bit of a concern – we had been under the impression that because we were planning to use  a wood stove that this would not be an issue.  After reading the above, and giving wood heating further consideration, I decided to learn how to do our own heat loss calculations and figure out how to install in-floor radiant heating using a hydronic (water) based system.  I ordered a copy of Modern Hydronic Heating from Amazon.com on May 22nd, received it first thing on May 24th, and read the majority of it on May 24th and May 25th.  After gripping a grip on the basics I downloaded some software called LoopCAD which has a 30 day free trial and got to work planning out the PEX tubing layout, in the basement concrete slab, and under the floor, between the floor joists, for the main floor.  All this in a bid to get a “heating plan” together for the inspector for a follow-up meeting we set up for May 26th @ 5:30pm.

When I presented our designed plan to the inspector he was clearly impressed by the work I had done and issued the building permit!  So we are good to go, full steam ahead with the build!

First Mail!

This post is a little late but better now than never – the following pictures are from the day after we set up the mailbox!

Felt pretty cool seeing the flag up for the first time.

Mailbox Update: Completed and Installed

Today was a cracker of a day, even though the mosquitoes are out in full force, it seemed an opportune time to get out and finish off the mailbox.  This involved stenciling/painting on our civic number, cutting a piece of 3/4″ plywood to mount the mailbox to, and cutting a 4×4″ western red cedar post to length (targeting bottom of mailbox @ 42″ high).  The plywood was then fastened to the 4×4″ post using four #8 x 1 1/2″ screws, and mounting the mailbox to the plywood using four 1/4″ x 1 1/4″ bolts.  I used locknuts to hold the mailbox to the plywood – not sure if it was necessary but it surely can’t hurt!

Here’s a small gallery of the bits and pieces throughout the process:

Some Spring Gardening

Over the past week we have been darting out in between the rain showers to get our garden started.  This included bolstering our berry patch with a new blueberry plant, and 25 everbearing strawberry roots – this added to our already healthy blueberry and two raspberry bushes.

We also chose a couple of high-bush cranberries to plant nearer to entrance to our property for a bit more interest when you first come in.

Garden Started
Our newly planted herb / lettuce and ornamental plant garden. Not much to see, yet!

On top of that we also started the herb and lettuce patch, by planting eight heads of red-leaf lettuce, 16 regular / curly parsley plants, another 6 italian parsley, and I think around 8 kale plants – god willing we will be self-reliant in terms of producing fresh greens for bunny’s daily needs in the near future.

A friend of ours had, a few years back now, given us a Cornos Alternifolia which we had planted in Toronto, but liked it so much we dug it up and brought it here with us.  We got that in the ground with a good bed of compost to settle it in, and hopefully it will thrive here.

Heather also ordered a selection of flowers and deer resistant plants which we planted appropriately around the garden bed – we’ll try and get some picture of them when they poke their way up and start making a show of it!

I was absolutely savaged mercilessly by mosquitoes during all the planting and am now covered in welts from all the bites.  Down with mosquito kind!

Sizing the Solar System (PV Array)

One of the most difficult parts of deciding to go off-grid has been the sizing of the solar system we will be using.  This is a pretty time consuming and sometimes difficult question to answer but in general what you are shooting to do is figure out how much power all the electrical devices in your house use, and use that as a starting point for all your calculations.

In some cases this is as simple as looking at your monthly power bill and it will generally tell you exactly how many kWh per month you are consuming.  If you are anything like us, in our city house we were using around 1000kWh/month or ~30kWh / day.  Of course this is in a large 4bdrm house with all electrical appliances, double oven, lots of computer gear running, and not a whole lot of attention paid to saving power.

Lets just go with the value of 30kWh / day for the sake of discussion here, though, we will be hoping to cut that considerably in our new house.  One of the more surprising things I’ve learned while embarking upon this house building journey is the large amount of government resources readily available on the web, free to use!  You can find all sorts of great information such as water well registrations (gives an idea how far we’ll need to drill to hit good water) but also information for renewable resources such as solar and wind.

One of the great tools for running some basic solar pv calculations is the venerable PVWatts provided by the National Renewable Energy Laboratory.  Thankfully the US Dept. of Energy has seen fit to share this super handy tool and outfit it with data points/locations around the world.  In our case, the closest city to us from the options available is Ottawa, Ontario in Canada, so we will pick “ON Ottawa” from the Canada drop-down and click the “*Start PVWatts For International Sites*” button in the bottom right of the form.  This tool may not look like much but don’t discount it’s value on looks alone.  There are only two values you really need to change on this page – the “DC Rating” in kW and the “DC to AC Derate Factor” – the default is 0.77 but this is for grid-tied installations, for off-grid we are using 0.52 – shows you how much power you lose converting DC to AC in an off-grid system!  You can also play with the “Array Tilt” value to see what impact different angles of your panels will have on your solar production – if you are doing a roof-mounted panel installation and you know the angle of your roof you can enter this value here.  For us, up here in the northern climate, we will choose a racking system that lets us switch between 45 degrees in the summer and the steeper 60 degrees in the winter.  By default you generally want your panels set to the equivalent of your latitude (f.ex Ottawa is at 45 degree latitude so a panel angle of 45 degrees is good.  However in winter when the sun is lower in the sky we increase the panel angle to 60 degrees to catch more of that light.)

For the DC Rating, you are basically going to play around with some values here to try to cover the 30kWh/day we talked about above.  So lets put 20kW as an array size / DC Rating and hit calculate; you’ll get back a list like the following:

Month
Solar Radiation
(kWh/m2/day)
AC
Energy

(kWh)
Energy
Value

(dollars CAN)
3.05      1044  89.99 
4.91      1499  129.21 
5.19      1690  145.68 
4.59      1340  115.51 
4.58      1325  114.21 
4.72      1270  109.47 
4.81      1324  114.13 
4.52      1238  106.72 
4.35      1208  104.13 
10  3.55      1082  93.27 
11  2.35      685  59.05 
12  2.78      927  79.91 

If we examine the third column, AC Energy (kWh), we can see that for every month except November and December we exceed our target of 30kWh / day or ~1000kWh / month.  November is grim up here with an average of only 2.35 hours of sun per day – that’s not a lot of time to get a battery bank fully charged!

There’s a lot to talk about here – first off is that a 20kW array would be substantial – both physically and cost wise.  If you went for the cheapest / most readily available panels in Ontario right now, the Canadian Solar 250W 60cell panels, you’d be looking at around 80 panels and with a cost of around 76cents per watt, the array would cost around $15,000CDN.  Consider also, that decent racking for your solar panels costs about the same as the panels themselves so you would be up to near $30,000 for panels and mounting alone, with none of the other necessary equipment!

This also doesn’t factor into account that we ran the calculations at a fixed 60 degree array tilt to optimize our winter solar collection, but if we run it again using 45 degrees for the summer months you can see we are well in excess of our goals.  Just oversizing a system like this will cost an extremely prohibitive amount of money and will lead to a needlessly complex and large system.  We’ll talk a little more about this in another post but for now this one is getting a bit long, so I’ll leave it here.

Off-Grid Solar System

As mentioned in a previous post, we have no grid power to our lot, it’s about 650m away and would require a fair amount of money to install, so we’ve decided to set up our house to be “off-grid”, using solar PV panels to charge a large battery bank which will then power standard electrical loads in the house through an AC inverter.

We’ll also have a backup generator (either gas or propane) to recharge our battery bank when there have been too many consecutive days without power.  I think we are going to go with approximately 8kW of PV panels, a 1300Ah battery bank, and a 6kW inverter.  I’ll devote a separate post to each of the main components of the system, and a complete system overview, in a later post!

Building Permit Application

Last Friday, May 2nd, we applied for our building permit.  We have almost everything in order and only need to complete one additional form regarding insulation R-values.  The building inspector mentioned that the hardest part about getting approved, is the septic system permit, which we already received from the Health Department, so there shouldn’t be any issues with the permit approval barring any unforeseen circumstances.

There are weight restrictions still in place on the rural roads around Merrickville, but as soon as those are lifted (next week or two) and we get our building permit, we can break ground!

First order of business is to find a good site surveyor to stake out the building site, then we can get the excavation crew in to prepare for the concrete forming / foundation contractors!

Getting (snail) mail

Getting mail in the country is a little different than getting mail in the city.  You have to install a mailbox per Canada Post guidelines for mail to be delivered.

If you’ve never received mail in a country mailbox before, you can both send and receive mail via your mailbox.  For outgoing mail, you put it in your box and put up the flag, when the postman sees the flag is up, they’ll stop and collect the mail on their way by.  When they deliver mail, they’ll also put up the flag to let you know there is something for you to collect.

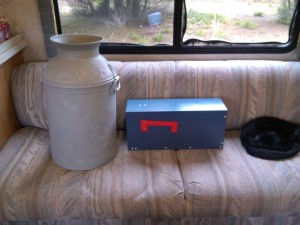
Our just primed milk jug and our new mailbox

You can install your mailbox in a number of ways but one of the preferred methods seems to be the use of an old milk jug – drop a 4×4″ post into it, fill it with concrete/dirt, and mount the mailbox on top.  The picture above shows our new mailbox and our milk jug which has recently been primed, after having been sandblasted to remove all the crud/rust.

In another post I’ll post some pictures of the painted milk jug, and a photo of the completed and installed mailbox.  We are just waiting on some stencils as we need to paint our name and civic number on the side of the box!